XULControl (class)
Overview
Summary
The XULControl class provides an object-oriented way to access and manipulate control elements in XMLUI dialogs.
Contents
- Overview
- API
Concept
The class is essentially a wrapper class that provides:
- OO property access to XMLUI control values
- a setter and getter for selectedIndex properties on compound controls (dropdowns, lists, etc)
- a reference to the control's original XML definition
- simple validation of the control's value
It is part of the XUL family, which is made up of 3 main classes:
- XUL - builds, creates and manages XUL dialogs
- XULControl - an object-oriented way to interact with UI controls
- XULEvent - an object-oriented Event class to handle system and user events in the XMLUI dialog
Usage
XULControls are never manually instantiated, as creation is handled exclusively by the XUL dialog class, but references to controls are passed around by XULEvents, and made available directly on the XUL class via the controls property.
In practice, as the only code that can run when dialogs are open is event handler code, you will normally only access control properties inside event handlers.
The anatomy of a control
Inspecting a XULControl will reveal the following properties and methods (note that elements and values will only be available on compound controls such as dropdowns or lists):
Inspect: XULControl (depth:4, objects:8, values:29, time:0.0 seconds)
---------------------------------------------------------------------
object => XULControl
     id: "options"
     type: "listbox"
     enumerable: true
     compound: true
     enabled: true
     visible: true
     value: 1
     selectedIndex: 0
    [values] => Array
         0: 1
         1: 2
         2: 3
    [elements] => Array
        [0] => Object
             label: "Label 1"
             value: 1
        [1] => Object
             label: "Label 2"
             value: 2
        [2] => Object
             label: "Label 3"
             value: 3
     getXUL: function ()
     getXML: function ()
     validate: function ()
     toString: function ()
Some of the properties listed above won't really be relevant outside of the control's internal code, such as enumerable or compound, but the rest are described below.
API - Properties
id
The node id attribute of the control
When you create controls the id of the control is derived either from the API id argument, or the XML node id attribute, and is then used to uniquely identify the control.
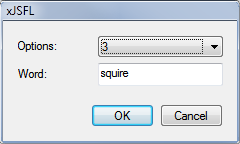
Typically you use the id of a control when referring to it within the xul.controls hash, as this example demonstrates by using the value of one control (options) to change the value of another (word):
function onChange(event)
{
   this.controls.word.value = words[event.control.value - 1];
}

var words = ['hello','there','squire'];
var xul = XUL
    .factory('dropdown:Options=[1,2,3],text:Word')
    .addEvent('options', 'change', onChange)
    .show();
type
The XML node type of the control
The following example grabs the value from one control (read) and assigns it to the value of another (write):
function onClick(event)
{
    this.controls.options2.value = this.controls.options1.value;
}

XUL
    .factory()
    .add('button:Click me,dropdown:Options 1=[1,2,3,4,5],dropdown:Options 2=[1,2,3,4,5]')
    .addEvent('clickme', 'click', onClick)
    .show();
value
The actual value of the control, rather than just the string
The following example grabs the value from one control (read) and assigns it to the value of another (write):
function onClick(event)
{
    this.controls.options2.value = this.controls.options1.value;
}

XUL
    .factory()
    .add('button:Click me,dropdown:Options 1=[1,2,3,4,5],dropdown:Options 2=[1,2,3,4,5]')
    .addEvent('clickme', 'click', onClick)
    .show();
enabled
Enables or Gets or sets the enabled state of the control the control
The following example enables and disables the dropdown as you click the Update button:
function onClick(event)
{
    var control = this.controls.options;
    control.enabled = ! control.enabled;
}

var xul = XUL
    .factory()
    .add('dropdown:Options={one:1,Two:2,Three:3},button:Update')
    .addEvent('update', 'click', onClick)
    .show();
visible
Gets or sets the visible state of the control
The following example makes the dropdown invisible or visible as you click the Update button:
function onClick(event)
{
    var control = this.controls.options;
    control.visible = ! control.visible;
}

var xul = XUL
    .factory()
    .add('dropdown:Options={one:1,Two:2,Three:3},button:Update')
    .addEvent('update', 'click', onClick)
    .show();
API - Properties, compund controls only
selectedIndex
Gets or sets the selected index of the control
The following example uses a text field to set the selectedIndex of a dropdown:
function onClick(event)
{
    this.controls.options.selectedIndex = this.controls.index.value;
}

var xul = XUL
    .factory()
    .add('dropdown:Options={one:1,Two:2,Three:3},text:Index=0,button:Update')
    .addEvent('update', 'click', onClick)
    .show();
The more usual alternative would be to directly set the value of the dropdown:
function onClick(event)
{
    this.controls.options.value = this.controls.value.value;
}

var xul = XUL
    .factory()
    .add('dropdown:Options={one:1,Two:2,Three:3},text:Value=1,button:Update')
    .addEvent('update', 'click', onClick)
    .show();
values
Set or get the child-element values (and labels) of a listbox, dropdown or radiobuttongroup (get only)
The following example give you two ways to set the values of a listbox, using both primitive values (i.e. Numbers or Strings), or an Array of Objects of the format {'label':value}:
function onClick(event)
{
    var control = this.controls.options;
    if(event.control.id == 'updateValues')
    {
        control.values = [1,2,3];
    }
    else
    {
        control.values = [{'Label 1':1},{'Label 2':2},{'Label 3':3}];
    }
}

var xul = XUL
    .factory()
    .add('list:Options')
    .addButton('Update with values', 'updateValues')
    .addButton('Update with labels', 'updateLabels')
    .addEvent('updateValues updateLabels', 'click', onClick)
    .show();
API - Methods
getXML()
Gets the XML String that originally created the control
The following example shows the XML for an options control immediately on creation:
function onInitialize(event)
{
    trace(this.controls.options.getXML());
}

var xul = XUL
    .factory()
    .add('dropdown:Options={one:1,Two:2,Three:3}')
    .addEvent('initialize', onInitialize)
    .show();
<row template="menulist">
    <label value="Options:"/>
    <menulist class="control" id="options" editable="" width="" flex="1" tabindex="" oncreate="xjsfl.ui.handleEvent(0, 'create', 'options')" onsetfocus="xjsfl.ui.handleEvent(0, 'setfocus', 'options')" onchange="xjsfl.ui.handleEvent(0, 'change', 'options'
        <menupop class="control" id="menupop">
            <menuitem label="one" value="1" selected="true"/>
            <menuitem label="Two" value="2" selected=""/>
            <menuitem label="Three" value="3" selected=""/>
        </menupop>
    </menulist>
</row>
Note that the control has an xml method rather than an xml property solely in order not to flood the Output panel with XML when debugging controls using Output.inspect().
toString()
A string representation of the control
The following example traces out a text control as the user types into it:
function onChange(event)
{
    trace(event.control);
}

var xul = XUL
    .factory()
    .add('text:Text')
    .addEvent('text', 'change', onChange)
    .show();
[object XULControl id="text" type="textbox" value="Hello there"]
Comments are closed.